When you’re dealing with modules in Go, the compiler usually fetches any needed modules from their online sources or repositories, and stashes them in a local cache. You’ll probably find this cache at $GOPATH/pkg/mod.
But if you want to be sure, you can run go env GOMODCACHE to see the exact location.
$ go env GOMODCACHE
/Users/phuong/go/pkg/mod
This cache is just a place on your host machine where Go keeps copies of all the downloaded modules. So, when you build your project using go build, or test it with go test, Go uses these cached copies to find and load the packages it needs.
Now, vendoring is a different strategy as it keeps a copy of all your project’s dependencies directly within the project’s directory, rather than relying on an external cache.
Here are some examples of well known Go projects that use vendoring:
- Kubernetes: You probably know it as the standard for container orchestration.
- VictoriaMetrics: An incredibly fast and scalable monitoring solution and time series database.
- Moby: Made by Docker to really push forward software containerization.
- Slim (Previously DockerSlim): A handy tool for inspecting, slimming down, and debugging your containers.
- Delve: A debugger for the Go programming language.
How to Vendor?
#
Our main player here is the go mod vendor command. It creates a special directory called ./vendor (by default) in your project’s main folder.
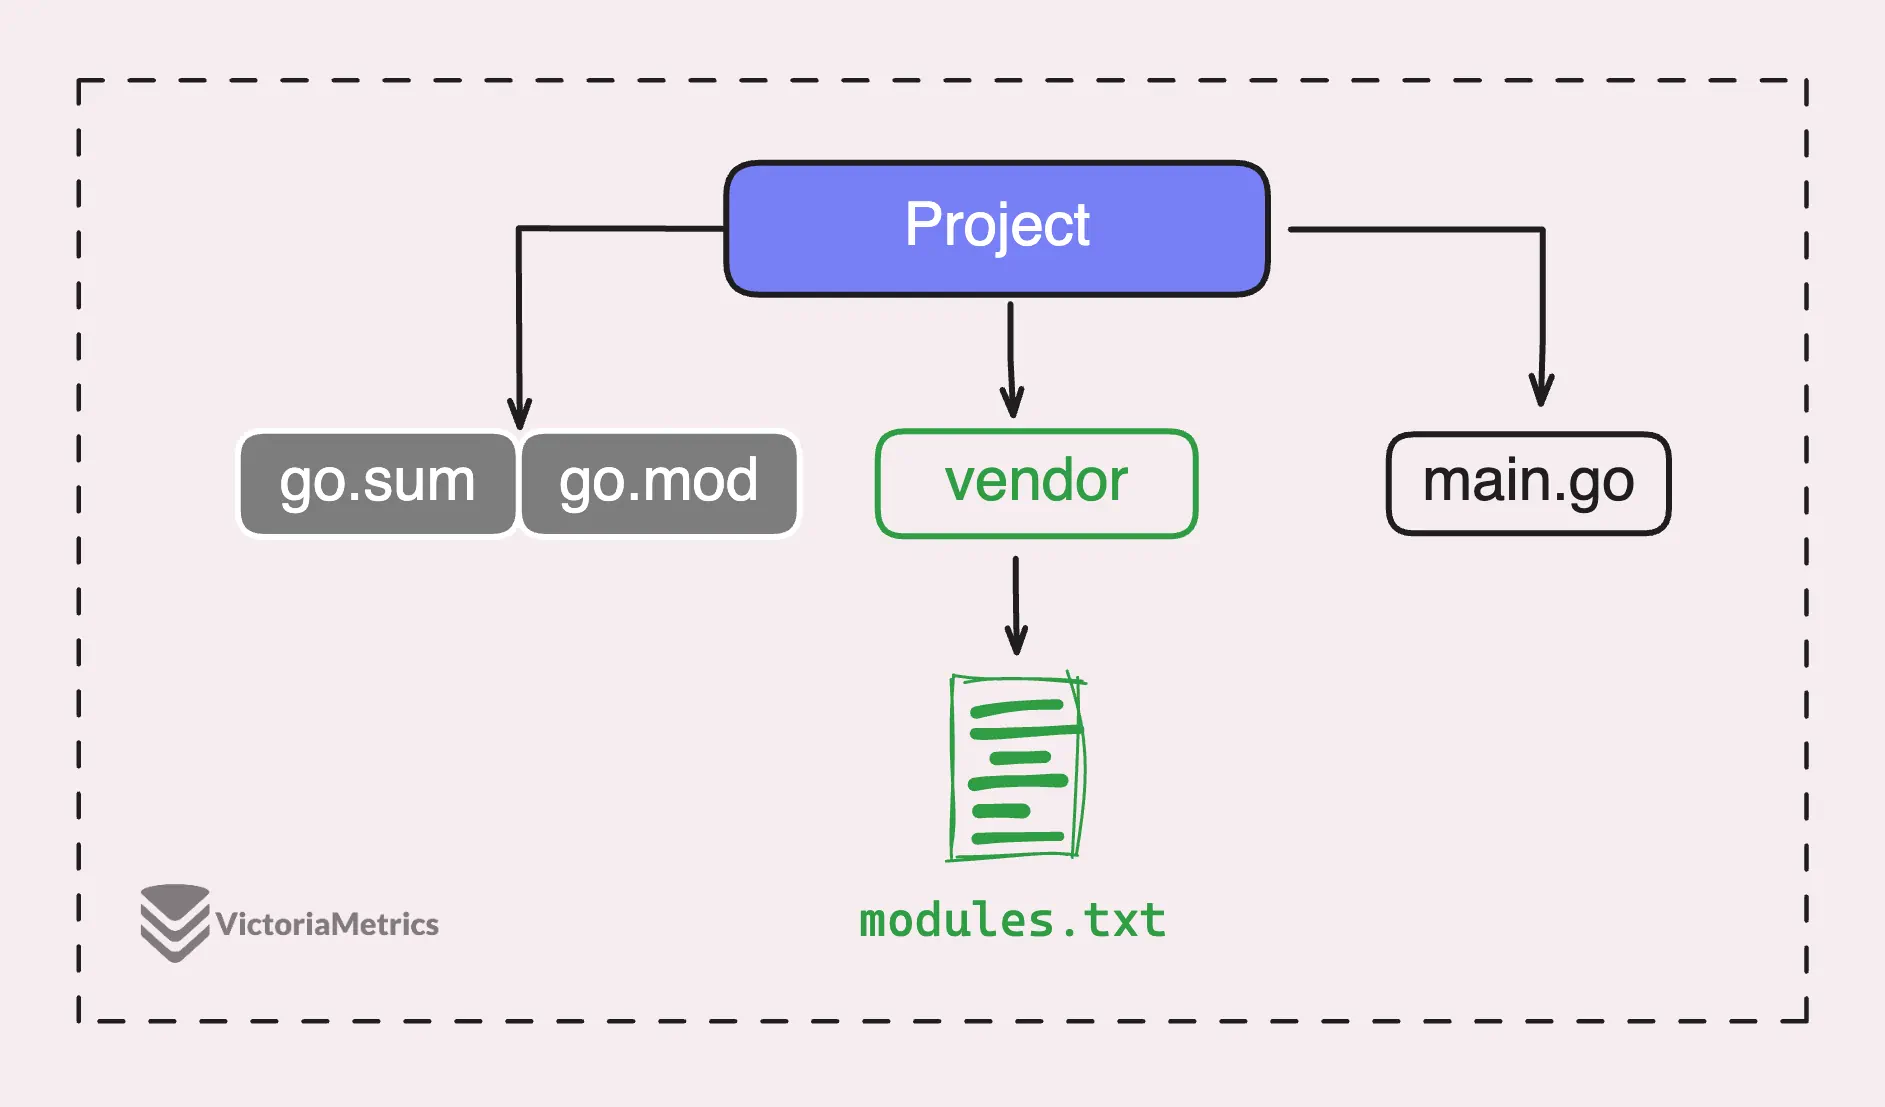
Good to know: your ./vendor directory doesn’t contain any test files (*_test.go), packages used by test files of dependencies, or the vendor folders of other dependencies.
Basically, it focuses on what’s strictly needed for your project’s own code and its direct tests.
/my-project
|-- go.mod
|-- go.sum
|-- main.go
|-- vendor/
    |-- modules.txt
    |-- github.com/
    |   |-- project1/
    |   |   |-- module1/
    |   |   |   |-- file1.go
    |   |   |   |-- file2.go
    |   |   |-- module2/
    |   |       |-- file3.go
    |   |       |-- file4.go
    |-- golang.org/
        |-- x/
            |-- module3/
                |-- file5.go
                |-- file6.go
If you notice, it also generates a file called vendor/modules.txt.
This file lists all the packages copied into the vendor directory and specifies the versions of these modules.
This list acts as a record of what versions of each package were used, which is important for keeping things consistent and making sure the project builds the same way every time:
# cloud.google.com/go v0.112.1
## explicit; go 1.19
cloud.google.com/go/internal/detect
cloud.google.com/go/internal/optional
cloud.google.com/go/internal/pubsub
# cloud.google.com/go/compute v1.25.1
## explicit; go 1.19
cloud.google.com/go/compute/internal
# cloud.google.com/go/compute/metadata v0.2.3
## explicit; go 1.19
cloud.google.com/go/compute/metadata
When vendoring is enabled, vendor/modules.txt becomes a source of info about which versions of modules are being used. Commands like go list -m or go version -m, which report on module versions, rely on this file to provide accurate data.
“How about go.mod? There are two sources of truth?”
Exactly, and they have to be in sync.
When vendoring is enabled, go list -m still prints info about the modules listed in go.mod. It uses vendor/modules.txt to confirm that the versions in the vendor directory match what’s declared in go.mod.
So, if there’s a mismatch between the versions, Go commands will let you know:
go: inconsistent vendoring in /my-project:
        github.com/Azure/azure-sdk-for-go/sdk/internal@v1.9.1: is explicitly required in go.mod, but not marked as explicit in vendor/modules.txt
        github.com/Azure/azure-sdk-for-go/sdk/internal@v1.9.0: is marked as explicit in vendor/modules.txt, but not explicitly required in go.mod

        To ignore the vendor directory, use -mod=readonly or -mod=mod.
        To sync the vendor directory, run:
                go mod vendor
Or if a module is listed in go.mod but not in vendor/modules.txt:
go: inconsistent vendoring in /my-project:
        github.com/user/project@v1.9.1: is explicitly required in go.mod, but not marked as explicit in vendor/modules.txt

        To ignore the vendor directory, use -mod=readonly or -mod=mod.
        To sync the vendor directory, run:
                go mod vendor
In both cases, you can run go mod vendor to update the vendor directory and get it back in sync with your go.mod.
Some commands, like go build and go test, will use packages in the vendor directory. But some commands won’t, such as:
go mod downloadstill fetches modules from the internet to the module cache.go mod tidystill downloads dependencies to the module cache and updates go.mod and go.sum. After that, you might need to rungo mod vendorto update the vendor directory.
If you have a vendor directory in the root of your main module and the Go version in go.mod is 1.14 or higher, you don’t need to do anything special to enable vendoring. Go will automatically recognize the vendor directory and use it for your project’s dependencies.
If you want to disable vendoring and instead use the module cache or the network to fetch dependencies, you have a couple of options with the -mod flag:
-mod=readonly: This uses go.mod, but you can’t update it. It’ll report an error if something’s wrong withgo build,go generate,go run, etc., but it doesn’t preventgo getorgo mod.-mod=mod: This switches back to the default behavior, ignoring the vendor directory entirely.-mod=vendor: This forces Go to use the vendor directory, even if there’s a go.mod file in the project.
If you don’t provide a flag, it’ll default to vendor if there’s a vendor folder and the Go version is 1.14 or higher, as we discussed earlier.
How Does Vendor Work?
#
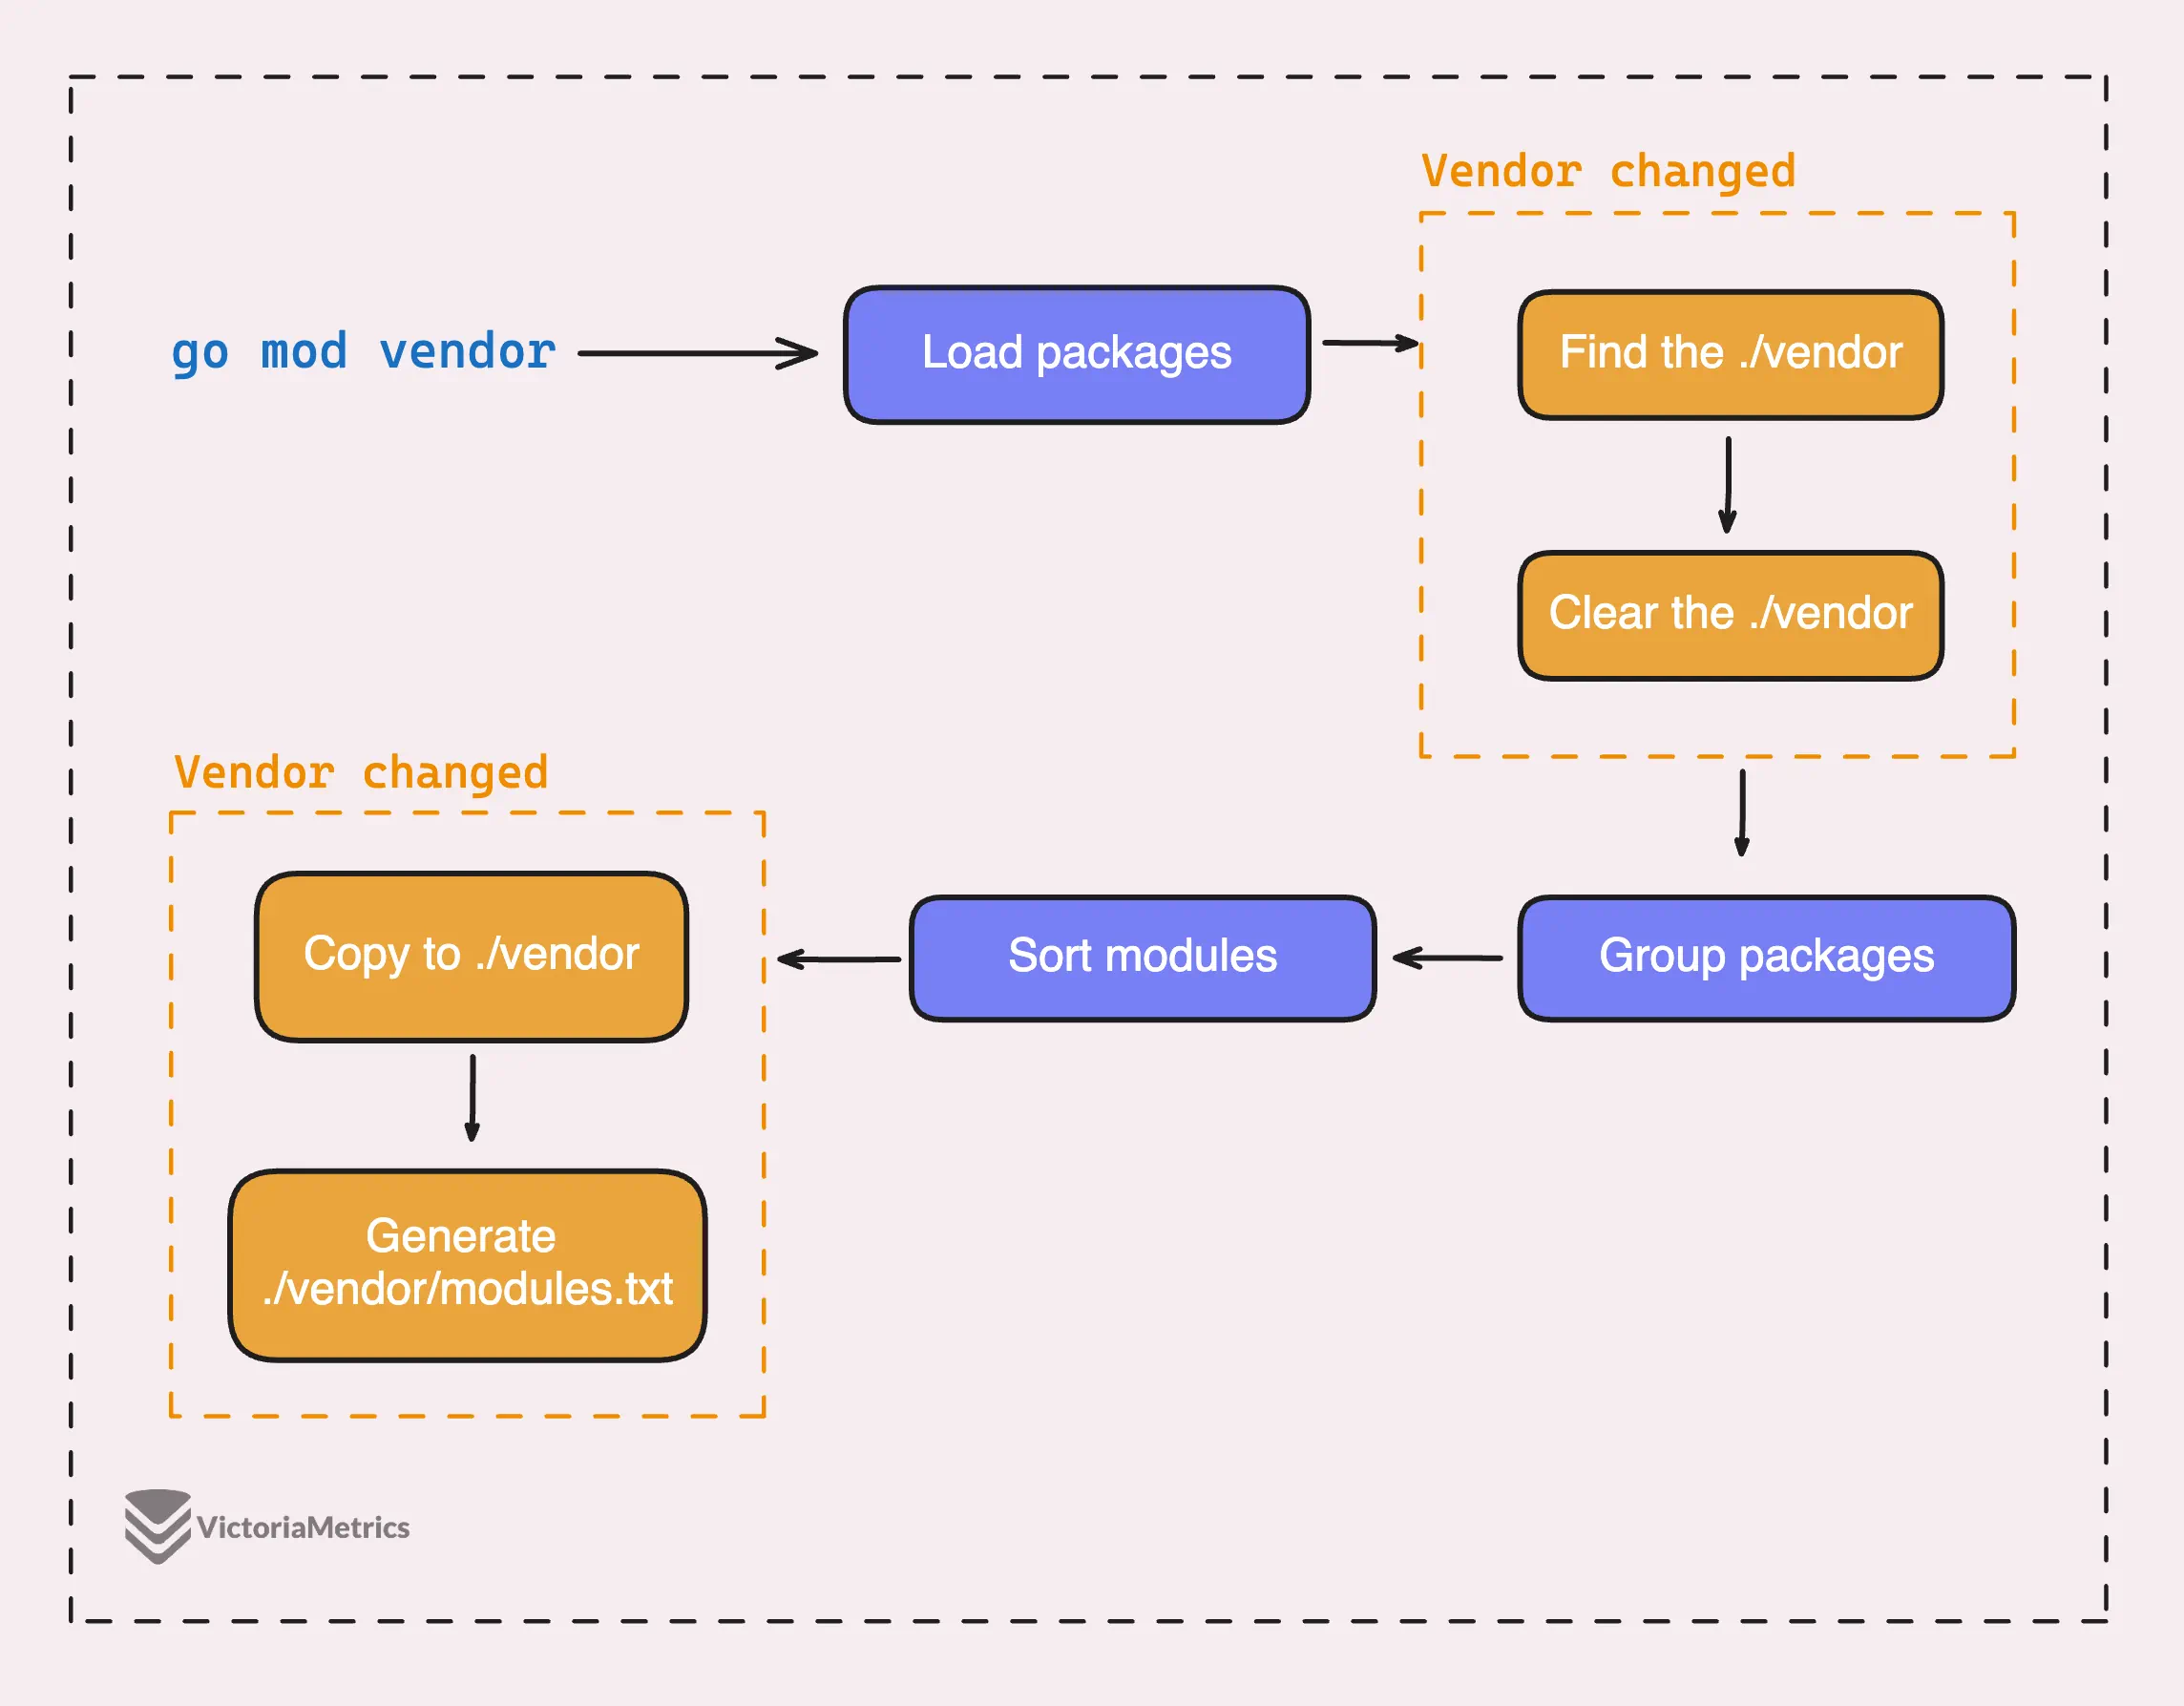
When you run the go mod vendor command, the RunVendor() function in the Go source code is the main engine that makes everything happen. You can check it out if you’re curious, but let’s break it down now.
Stage 1: Fetching
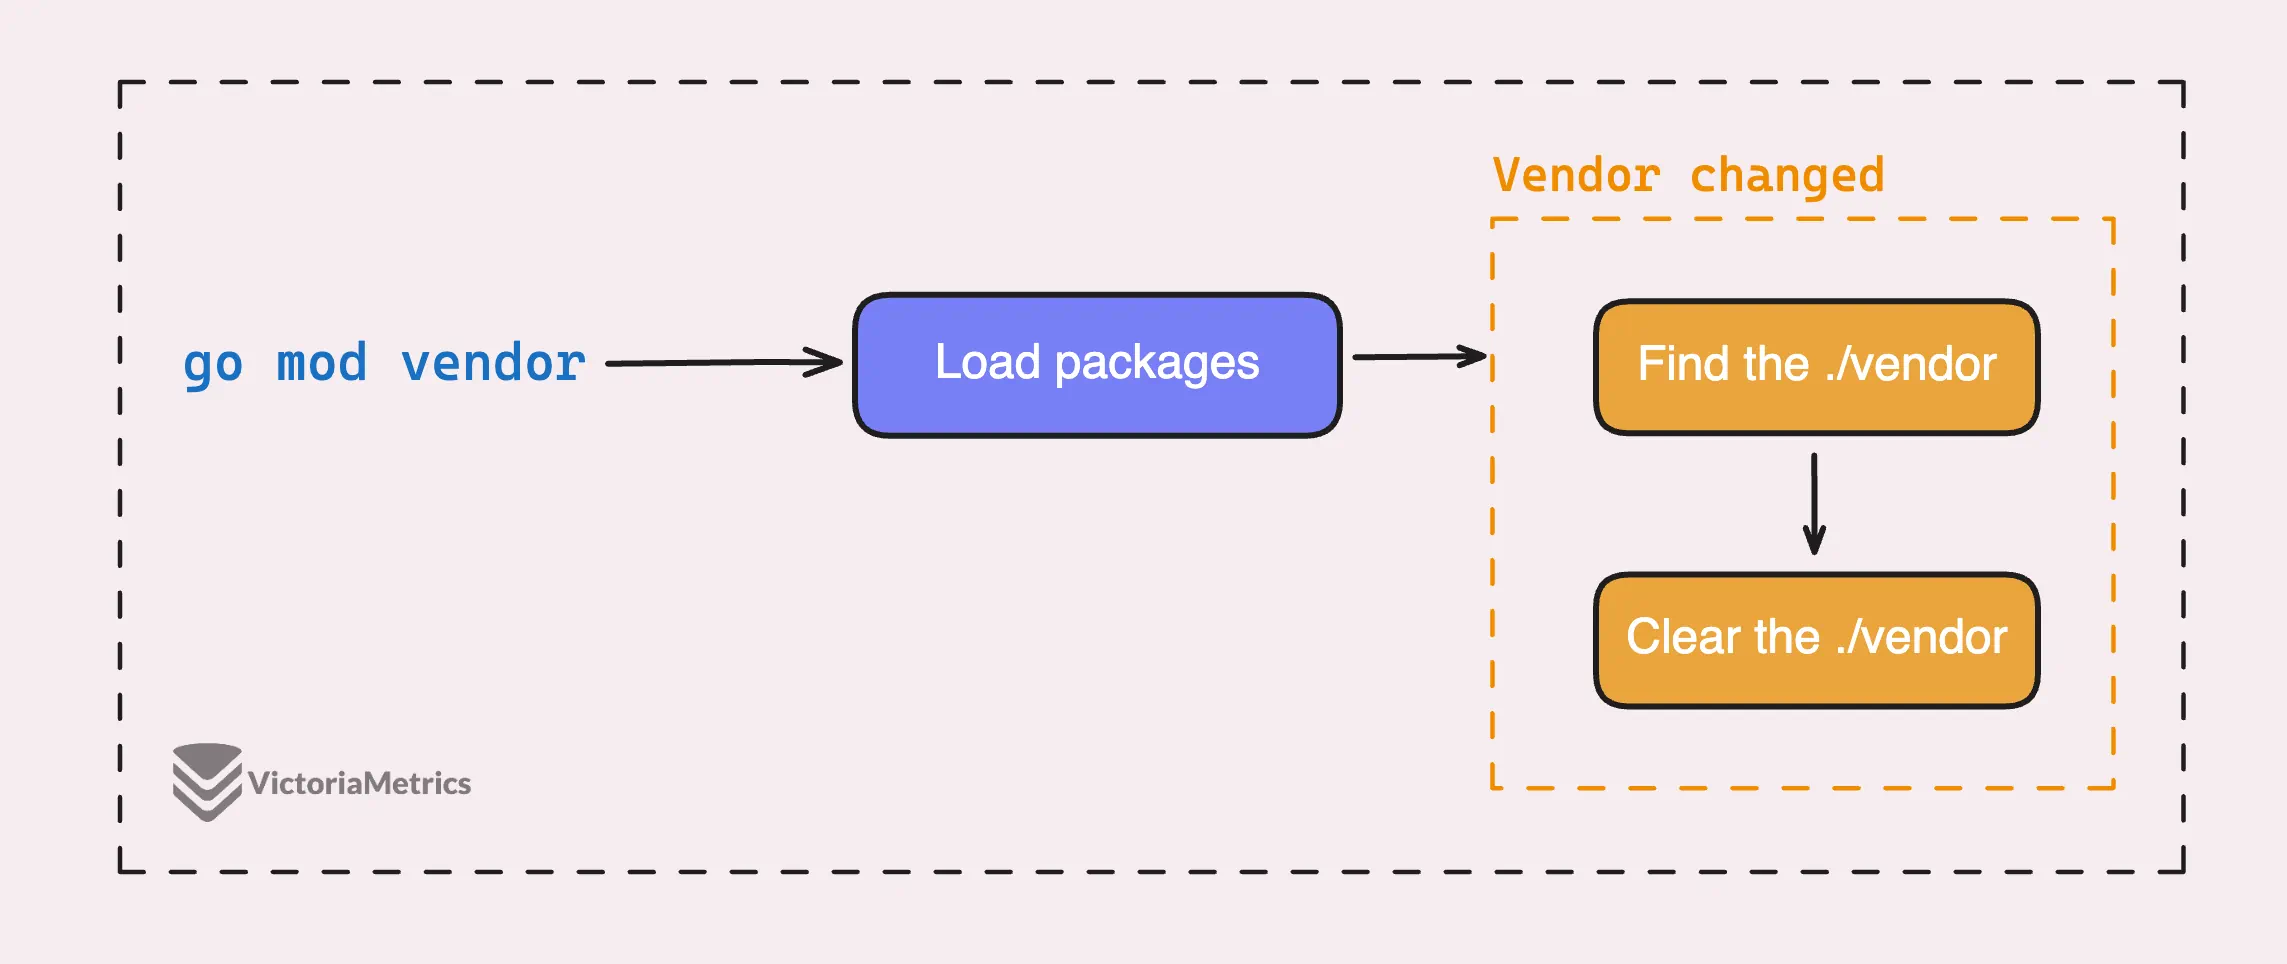
Go configures options to load all the packages needed to build and test the main module. It also resolves any missing imports and allows errors if the -e flag is set.
To find the actual source code for the packages, it uses the module cache first. But if the packages haven’t been downloaded yet, it fetches them from the module proxy or the source repository.
Next, it figures out where to create the vendor directory.
By default, this is a directory named vendor in the root of your project. But if you use the -o flag, you can specify a different location. Go then clears out any existing content in this directory to start fresh.
That’s why we shouldn’t put or change anything in the vendor directory.
Stage 2: Populating
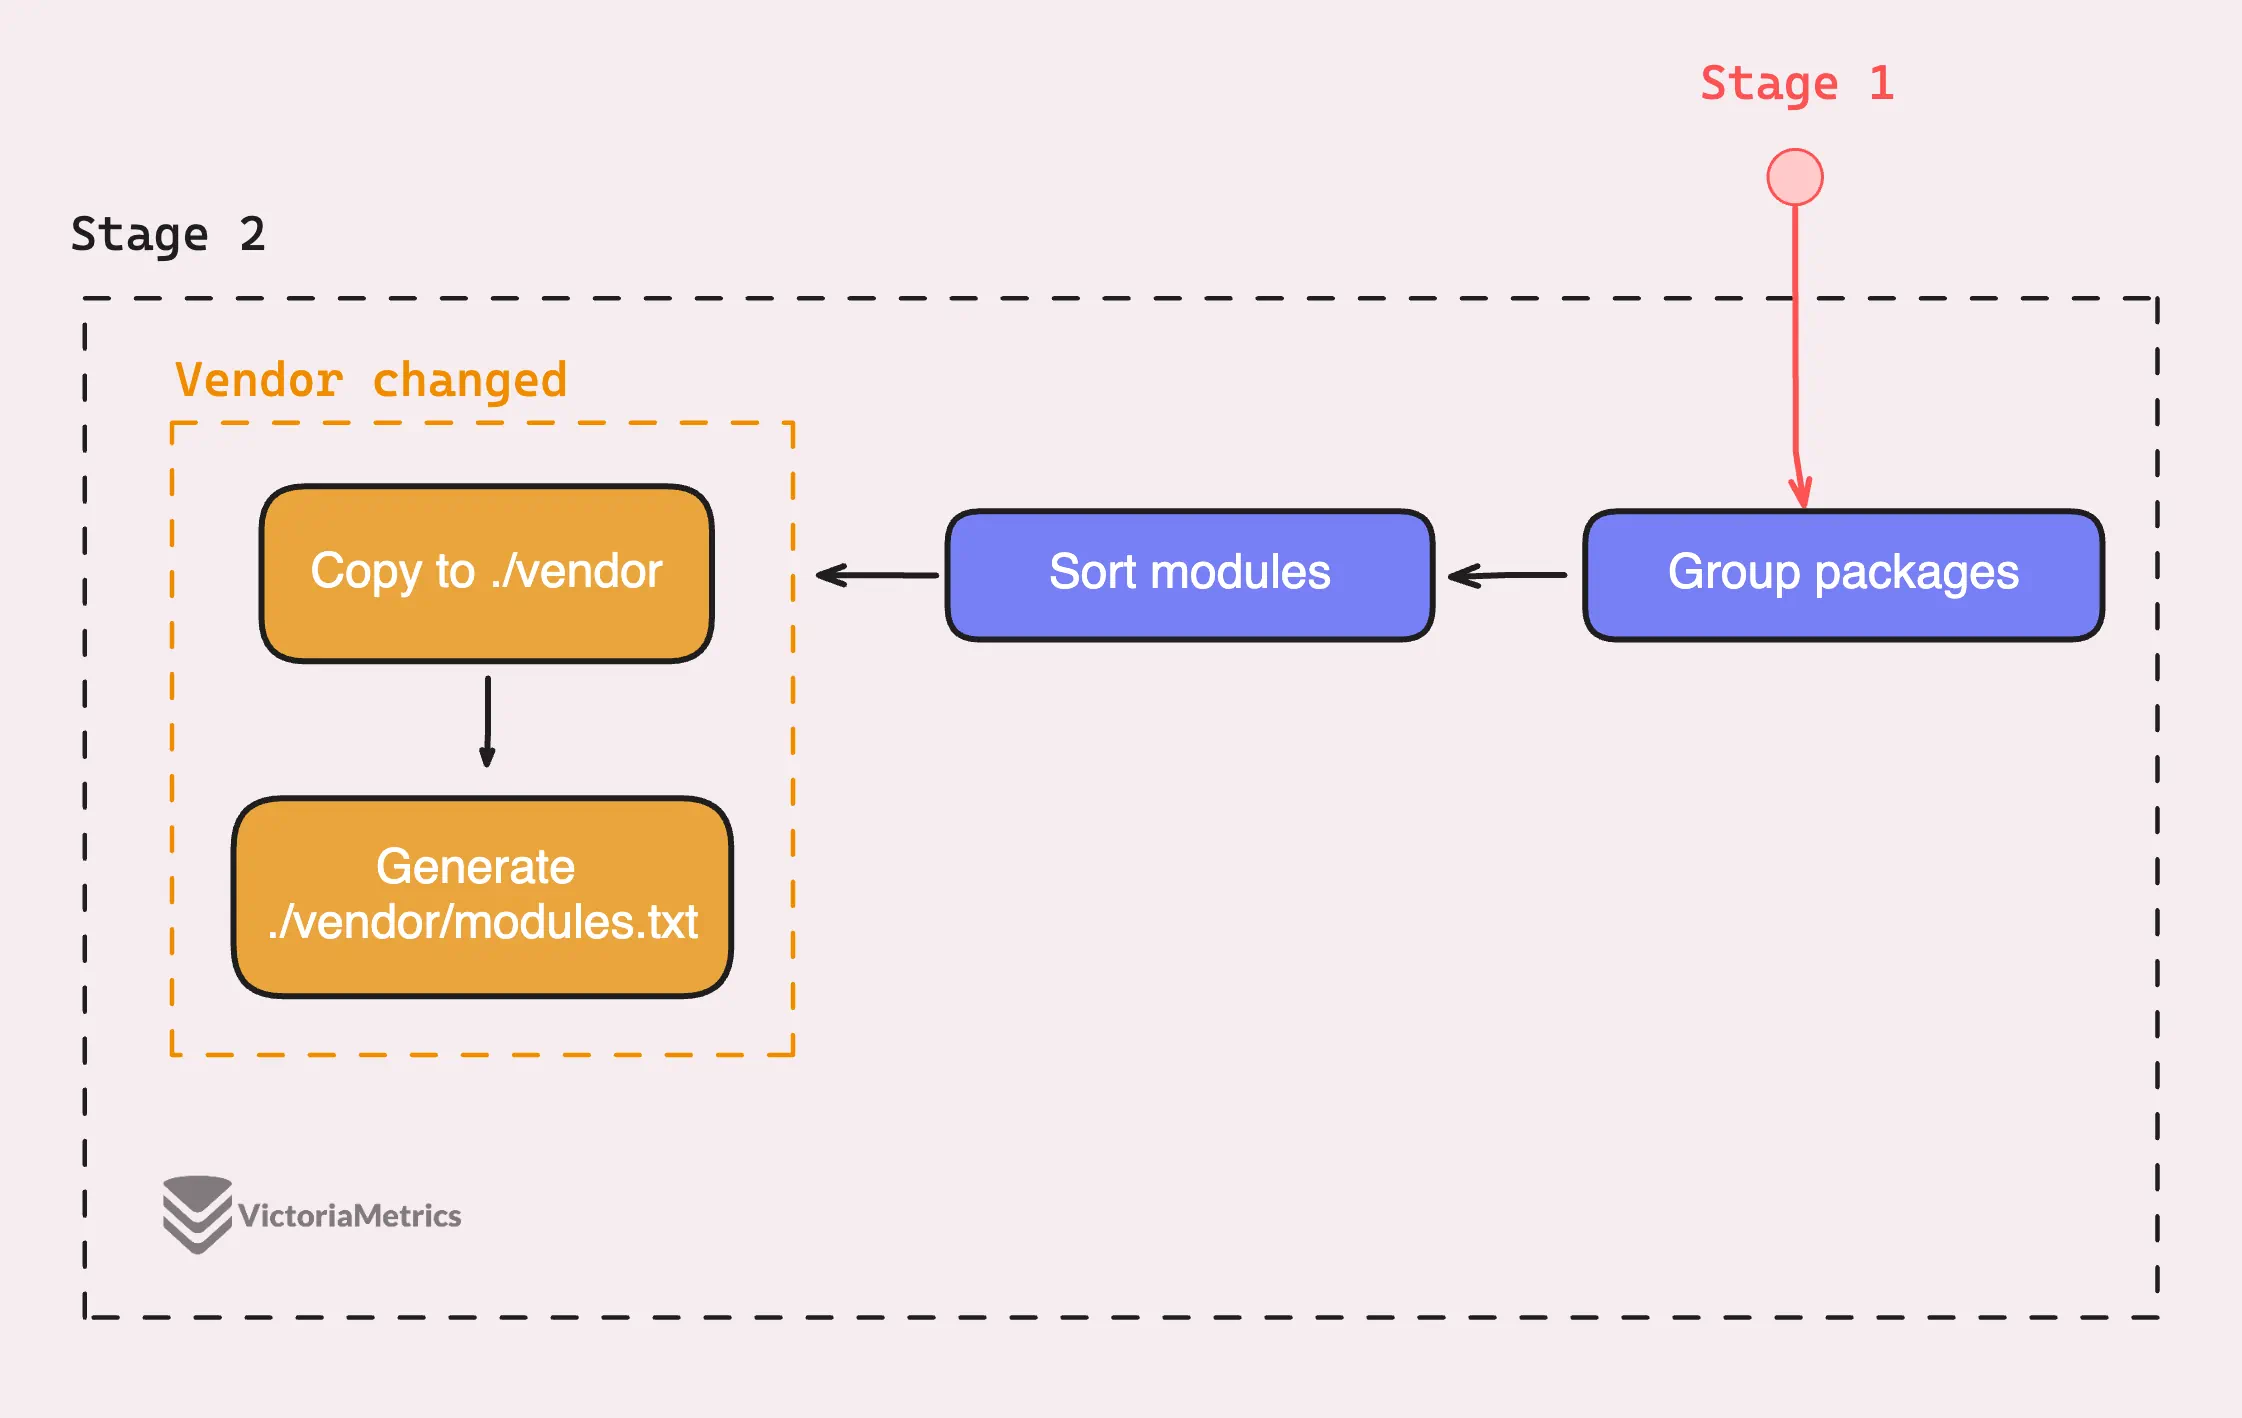
Go then goes through all the loaded packages and groups them by their containing modules. It also keeps track of which modules are explicitly listed in your go.mod file and gathers info about the Go version directives for each module.
This info is important for creating a detailed modules.txt file later.
# github.com/VictoriaMetrics/easyproto v0.1.4
## explicit; go 1.18
github.com/VictoriaMetrics/easyproto
# github.com/VictoriaMetrics/fastcache v1.12.2
## explicit; go 1.13
github.com/VictoriaMetrics/fastcache
# github.com/VictoriaMetrics/metrics v1.34.1
## explicit; go 1.17
github.com/VictoriaMetrics/metrics
Before continuing, the function sorts the modules to process them in a consistent order, make sure our build is better reproducible.
Now, with the modules and packages organized and sorted, Go starts copying the source files for each package into the vendor directory.
It skips test files and files that are explicitly ignored, ensuring only the necessary files are included. As it copies the files, the function creates a modules.txt file.
So, here’s the big picture of what we just discussed, it’s also our thumbnail for this post.

Should I commit the vendor directory?
#
When you’ve got a ./vendor directory, it holds all the external modules your project uses, right under your nose.
You can mess around, tweak, and test the code right there in the ./vendor directory until it works perfectly with your project. Once everything is working as expected, you can then send your changes to the original creators of the dependency.
“Does that mean I can change the code in the vendor directory?”
Yeah, absolutely. But it’s not the good idea because your changes will get wiped out when you update the vendor, as we mentioned in How Does Vendor Work.
The downside?
Your project doesn’t share the same cache with other projects, so you might end up with multiple copies of the same module across different projects. It’s a bit inefficient for your local machine.
“But how about committing the vendor directory?”
This is definitely handy for CI/CD builds since you don’t have to stress about internet availability or external dependencies.
When a dependency changed, it recorded into our history git commit. This is rarely the need for most of people, but for project that rely on really tiny dependencies, it’s a good thing to keep track the changes.
But if you rely on many dependencies, I would recommend using modules as normal way.
VictoriaMetrics does uses vendoring, our CTO Aliaksandr Valialkin shared his thought:
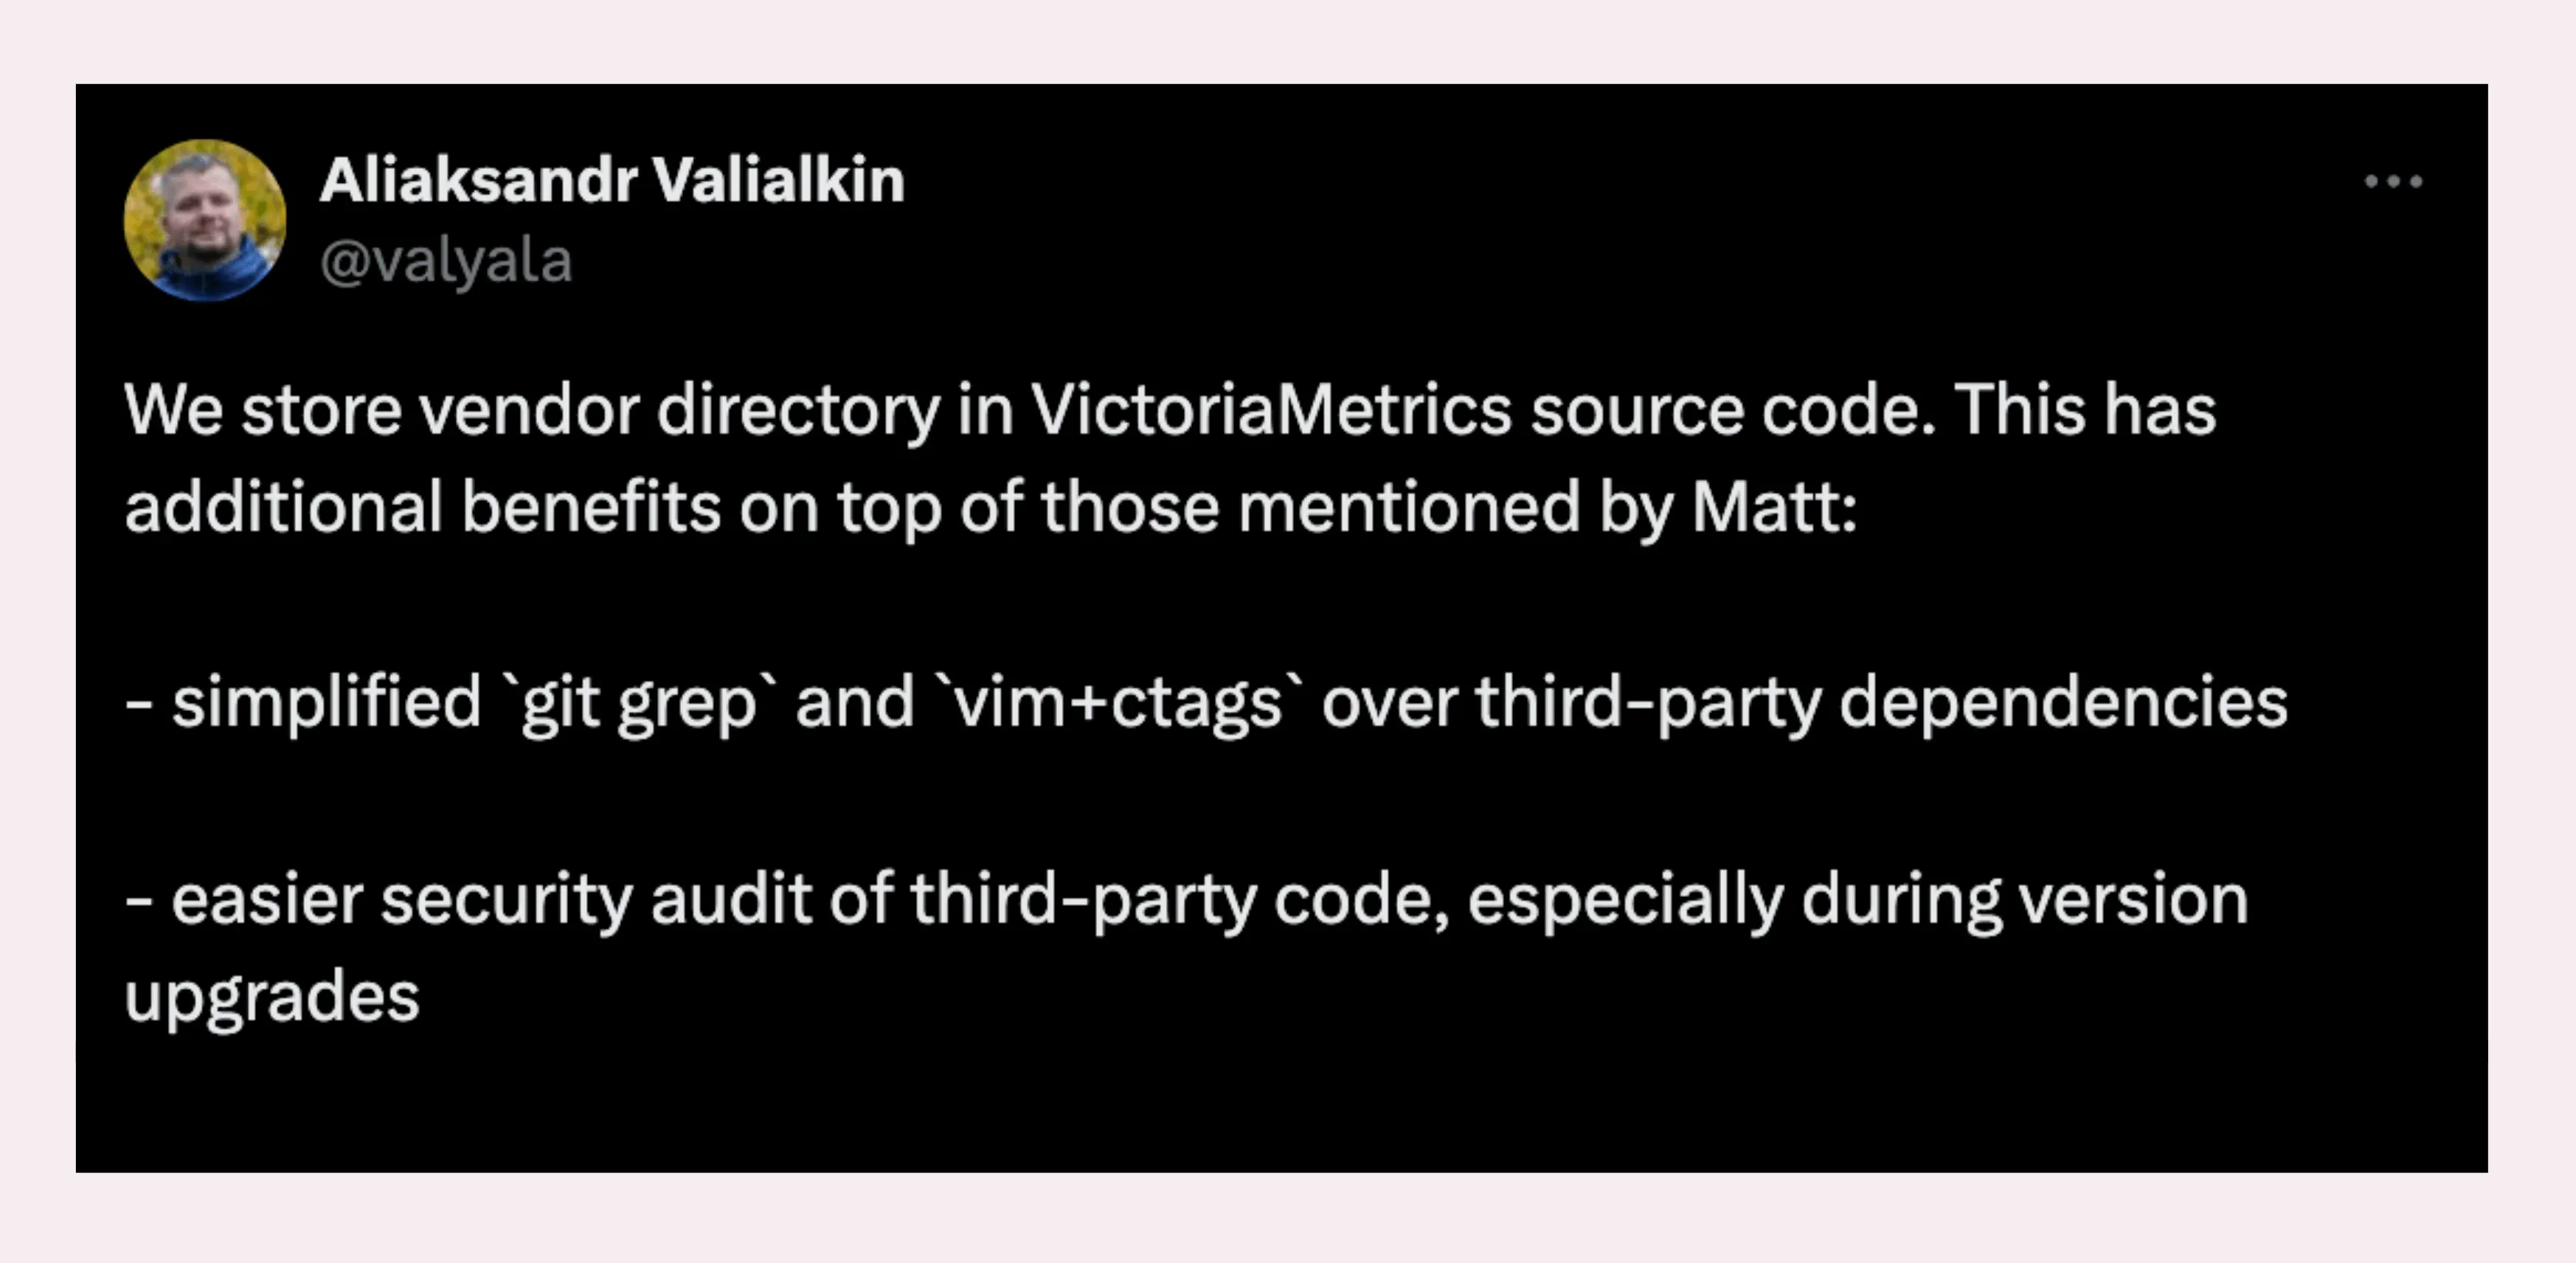
“Is there any way I can make changes but not have them replaced? I still want to update the dependency but keep my changes.”
Yes, there’s a simple workaround for that, and this solution does not apply to vendoring.
You can change the modules fetched from the remote repository and fetch the latest version without replacing your changes by using git submodules combined with the ‘replace’ directive in go.mod.
“So, to sum up, should I use vendoring or commit vendor directory?”
As an “experienced” writer, I’d say it depends.
If you don’t want to worry about the network, don’t need to go mod download every time you build on CI/CD, or you want to keep all the dependencies in one place and keep track of which dependency just updated, then vendoring is a good choice.
You can even change the vendor code, which I quite like since I use a lot of my own forked versions.
Of course, if you don’t care much about really tiny details, want to reduce repository size, want to avoid duplication of dependencies in multiple projects, you can always rely on the module cache. The default behavior of Go is quite good.
Stay Connected
#
Hi, I’m Phuong Le, a software engineer at VictoriaMetrics. The writing style above focuses on clarity and simplicity, explaining concepts in a way that’s easy to understand, even if it’s not always perfectly aligned with academic precision.
If you spot anything that’s outdated or if you have questions, don’t hesitate to reach out. You can drop me a DM on X(@func25).
Related articles:
- Golang Defer: From Basic To Traps
- How Go Arrays Work and Get Tricky with For-Range
- Go Sync Mutex: Normal & Starvation Mode
- Go Maps Explained: How Key-Value Pairs Are Actually Stored
Who We Are
#
If you want to monitor your services, track metrics, and see how everything performs, you might want to check out VictoriaMetrics. It’s a fast, open-source, and cost-saving way to keep an eye on your infrastructure.
And we’re Gophers, enthusiasts who love researching, experimenting, and sharing knowledge about Go and its ecosystem.